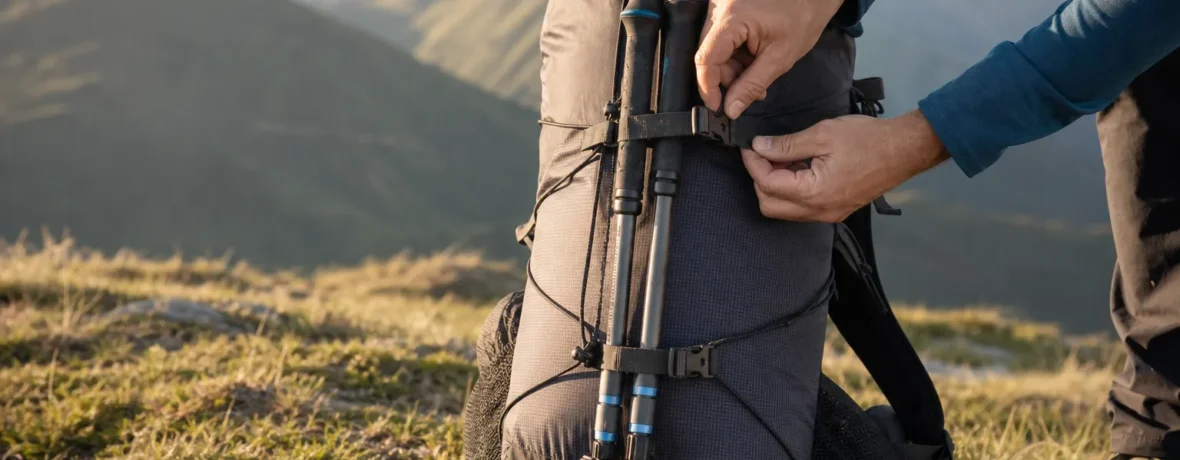
Here’s how to attach hiking poles to backpack loops: collapse the poles to their shortest length, point the tips down, seat the baskets or handles in a lower loop or side pocket, then cinch the upper shaft under a compression strap. Use rubber tip covers if the points face your pack.
How do you attach hiking poles to a backpack step by step?
Use two anchor points: one low point to stop the poles from sliding out and one high strap to stop them from bouncing.
- Collapse both poles fully. Shorter poles ride tighter. Lock each section so a loose lower shaft does not extend while you hike.
- Put rubber tip protectors on the points. This keeps carbide or steel tips from chewing up your pack, rain jacket, or car seat later. REI’s trekking pole guide also recommends tip protectors for protecting gear when poles are stowed in a pack: REI guide to using trekking poles.
- Choose your lower anchor. Use a trekking pole loop, ice axe loop, lower compression strap, or side water-bottle pocket.
- Set the pole tips down unless your pack design says otherwise. Tips-down keeps mud and grit away from your shoulder straps and face. If the tips are exposed, keep them inside your body line so they do not spear brush or other hikers.
- Drop the tips or baskets into the lower loop. If your poles have big mud or snow baskets, the basket can act like a stopper. If the baskets are tiny, run the shaft through the loop instead.
- Rotate the handles upward. Keep the grips together and line them up with the side of the pack, not sticking straight out like antennas.
- Cinch the upper compression strap over both shafts. Pull it snug enough that the poles do not rattle when you shake the pack.
- Check the swing zone. Put the pack on and move your arms. The pole handles should not slap your elbows. The tips should not hit your calves.
- Walk 20 steps, then re-tighten. Webbing settles. A quick second pull keeps the system quiet.
That is the cleanest method for most daypacks and overnight packs. You are not trying to make the poles look fancy. You are trying to make them boring. No clank. No swing. No sharp points hunting for your rain shell.
What is the best way to attach trekking poles to a backpack?
The best method is the one your pack already gives you: a lower pole loop plus an upper compression strap.
Many hiking packs have tool loops, lash points, daisy chains, or dedicated pole carriers. REI describes trekking poles as common outside-pack items and points to tool loops, fasteners, daisy chains, lash patches, and compression straps as typical ways to carry awkward gear: REI guide to packing a backpack. Use those built-in parts first before adding extra cords.
| Attachment method | Best for | Watch out for |
|---|---|---|
| Lower loop + upper compression strap | Most hiking and backpacking packs | Loose straps can let poles bounce |
| Side pocket + compression strap | Daypacks with bottle pockets | Pole tips can puncture mesh pockets |
| Daisy chain + cord or shock cord | Ultralight packs and simple rucksacks | Needs a good knot or cord lock |
| Inside the pack | Travel, bushwhacking, crowded trails | Wet or muddy poles need a sleeve |
If your pack has a dedicated quick-stow system, follow the maker’s layout. Osprey’s Stow-on-the-Go design, for example, uses an elasticized loop on the lower left side of the pack and a cord loop on the left harness strap so the poles can be secured while wearing the pack: Osprey owner’s manual. Other brands use similar ideas with different hardware.
Should hiking pole tips point up or down on a backpack?
Point the tips down for normal hiking, unless your pack’s pole carrier is designed the other way.
Tips-down is tidy. Mud stays low. Sharp points stay away from your neck, hat, and sunglasses. The downside is that exposed tips can scrape rock, catch vegetation, or poke someone behind you if they hang too low.
Tips-up can work when the poles ride in a deep side pocket and the handles are trapped low. But it puts the pointy end higher, which is a bad trade if you hike under blowdowns, ride in a shuttle, or move through a crowded trailhead.
Use this quick rule:
- Tips down: best for most trails and most backpacks.
- Tips up: only when the lower handle is better captured and the tips are covered.
- Tips inside the pack: best for flights, buses, dense brush, and long scrambles where snagging matters.
How do you use backpack loops for trekking poles?
Thread the pole tips, baskets, or lower shafts through the loops, then trap the upper shafts with a strap.
Those little loops on the bottom or lower front of a backpack are usually tool loops. They may be built for trekking poles, ice axes, or general lash-on gear. They are not magic by themselves. A lower loop only stops the poles from falling down. You still need a second attachment point higher on the pack.
Here is the clean loop method:
- Find the lower loop on one side of the pack.
- Slide both pole tips through the loop from outside to inside, or place the baskets against the loop so they cannot pull through.
- Lay both collapsed poles flat against the side panel.
- Run the upper compression strap around the poles.
- Tighten until the poles sit flat against the pack.
If your poles have large snow baskets, test the fit before the trail. Some baskets are too wide for small gear loops. Do not force them. Either remove the baskets or lash the shafts instead.
How do you attach hiking poles to a backpack with side pockets?
Put the handles or protected tips into the side pocket, then tighten the side compression strap around the pole shafts.
This is the easiest method on a small daypack. It works especially well when the side pocket is deep and the compression strap sits above it.
Use it like this:
- Cover the tips if they will sit inside a mesh pocket.
- Drop the handle ends into the pocket if the tips are too sharp for the fabric.
- Keep both poles on the same side of the pack so the other pocket can still hold a bottle.
- Run the upper side strap across the shafts, not across the grips.
- Tighten until the pole sections cannot clack together.
Do not stuff bare carbide tips into thin stretch mesh. That mesh is built for bottles and snacks, not metal spikes. If the side pocket is already torn or shallow, skip this method and use the lower loop instead.
Can you attach trekking poles to a backpack without loops?
Yes, you can use side compression straps, daisy chains, shock cord, or a simple two-strap lashing.
No loops? No problem. You need friction and two points of contact. The poles should touch the pack in two places at minimum. Three is better for long trail days.
Here are the best no-loop fixes:
- Use two compression straps. Run one around the lower shafts and one around the upper shafts. Cinch hard.
- Add shock cord to daisy chains. Thread cord through two daisy-chain loops and secure it with a cord lock.
- Use accessory straps. Thin webbing straps with side-release buckles work well and are easy to adjust with gloves.
- Use Voile-style ski straps. These grip pole shafts tightly and do not loosen easily.
- Stow poles inside the main compartment. Wrap muddy poles in a spare stuff sack, pack liner, or trash bag first.
Avoid dangling poles from a single carabiner. They swing, clank, catch branches, and smack your legs. That setup feels clever for 60 seconds and annoying for the next 6 miles [9.7 km].
Where should hiking poles sit on a backpack?
Hiking poles should sit tight against one side or the front of the pack, with no part sticking wider than your shoulders.
Keep them close to the pack’s body. If your poles hang outside your profile, they become trail hooks. They catch branches, scrape rock walls, snag shuttle doors, and clip people at overlooks.
The side of the pack is usually best for day hikes. The front panel works if your pack has vertical daisy chains or a shove-it pocket. The back-facing front panel also keeps the poles away from your arms, but it can make sitting down awkward if the tips extend below the pack.
Use this placement checklist before you start walking:
- The poles do not block water-bottle access unless you are carrying water elsewhere.
- The handles do not hit your elbows during a normal arm swing.
- The tips do not hang below the bottom of the pack by more than 2 inches [5 cm].
- The poles do not cover a zipper you need during the day.
- The shafts are tight enough that they stay quiet when you shake the pack.
How do you keep trekking poles from falling off a backpack?
Use two tight anchor points, cover the tips, and check the straps after the first few minutes of hiking.
Most pole-carry problems come from one mistake: the lower end is captured, but the upper end is barely held. A compression strap should cross the shafts at a firm angle. If the strap lies over a tapered section, the poles can slide downward as you walk.
Try these fixes:
- Cross the straps over the thickest shaft section. Wider sections resist sliding better.
- Bundle the poles together first. Use the wrist straps, a small hook-and-loop wrap, or a rubber band.
- Face locking levers outward. This keeps lever bumps from rubbing holes into your pack fabric.
- Remove big baskets when you do not need them. They snag more easily and can lever the poles loose.
- Do a shake test. Hold the haul loop and shake the loaded pack. If the poles knock, tighten again.
If the poles keep slipping, add one small strap around the pair before attaching them to the pack. A 6-inch [15 cm] hook-and-loop ski strap is enough for most collapsed poles.
What should you avoid when carrying hiking poles on a backpack?
Avoid exposed tips, loose single-point attachments, and pole positions that stick out beyond your body.
Bad pole carry is more than annoying. It can tear mesh, scratch sunglasses, puncture a rain shell, or trip the hiker behind you. Keep the setup neat.
- Do not leave carbide tips uncovered if they touch fabric.
- Do not hang poles from one carabiner.
- Do not point tips toward your head or another hiker.
- Do not lash poles across the pack horizontally on narrow trails.
- Do not block your bear spray, water, map, phone, or rain jacket.
- Do not over-tighten straps across fragile carbon shafts; snug is enough.
Carbon poles deserve a little extra care. They are strong under normal pole loads, but side crushing from a narrow strap pulled brutally tight is not the same kind of load. If you are cinching hard, place the strap over a reinforced section or add a soft wrap between the strap and shaft.
Can you put hiking poles inside a backpack?
Yes, and inside carry is the cleanest choice for travel, thick brush, scrambling, and any route where outside gear will snag.
Internal storage works best with folding poles, short collapsed poles, or packs tall enough to swallow the full length. Put dirty tips in a stuff sack, tent stake bag, or plastic bag. If the poles are wet, keep them away from down insulation and spare socks.
Inside carry is also smart when you are climbing ladders, using fixed cables, riding a crowded shuttle, or moving through airport lines. External poles are fine on open trail. In tight human spaces, they become awkward fast.
If you fly in the United States, check current TSA guidance before packing. As of November 2026, TSA’s public “What Can I Bring?” listing says blunt-tipped hiking poles may go in carry-on or checked bags, but TSA officers make the final checkpoint decision and airlines still control cabin-size rules: TSA hiking poles guidance. Sharp tips, international airports, and airline policies can change the practical answer, so checked luggage remains the safer bet for expensive poles.
How do you pack hiking poles for different backpack types?
Match the carry method to the pack: bigger backpacking packs usually have better loops, while small daypacks often need the side-pocket method.
| Pack type | Best pole setup | Why it works |
|---|---|---|
| Small daypack | Side pocket plus upper compression strap | Fast, simple, no extra hardware |
| Overnight backpack | Lower tool loop plus side compression strap | Stable under heavier loads |
| Ultralight pack | Daisy chain plus shock cord or accessory strap | Works with minimal built-in features |
| Travel pack | Inside the main compartment | Prevents snagging in airports and vehicles |
Before buying a pack, look for pole-friendly details: lower loops, usable side compression straps, durable side pockets, and lash points. Tiny fashion straps that barely tighten are not the same as real compression straps.
Related reading
- How to Attach a Sleeping Bag to a Backpack
- How to Pack a Hiking Backpack: Weight Zones and a Simple Diagram
- How to Choose a Hiking Backpack: Volume, Torso Length and Fit
- How to Choose Hiking Poles: Length, Locks and Materials
FAQ
How do you attach hiking poles to a backpack if it has no straps?
Add two accessory straps or shock-cord loops. One should hold the lower shaft, and one should hold the upper shaft so the poles cannot swing.
Is it better to carry trekking poles on the side or front of a backpack?
The side is better for most hikers because it keeps the poles slim and easy to reach. The front works well if your pack has daisy chains or a shove-it pocket and you do not need frequent access to that panel.
Should I remove trekking pole baskets before attaching poles to my pack?
Remove large snow baskets if they snag brush or do not fit your pack loops. Keep small trekking baskets on if they help stop the poles from sliding through the lower loop.
Can hiking poles damage a backpack?
Yes, uncovered metal tips and dirty baskets can tear mesh, abrade fabric, or scratch coated materials. Use rubber tip covers and keep sharp ends away from pockets, rain covers, and pack liners.
Can I attach only one hiking pole to a backpack?
Yes, use the same two-point method for one pole. Cinch it tighter than you would a pair because a single shaft has more room to rotate under a strap.
What is the quickest way to stow poles during a hike?
A dedicated quick-stow system is fastest because you can often use it without taking the pack off. If your pack lacks that feature, the side pocket plus compression strap method is the quickest reliable option.